I turned homemade apple pie filling and crescent dough into flash-fried then baked Apple Pie Bombs that add a playful twist to Desserts for Fall Parties.
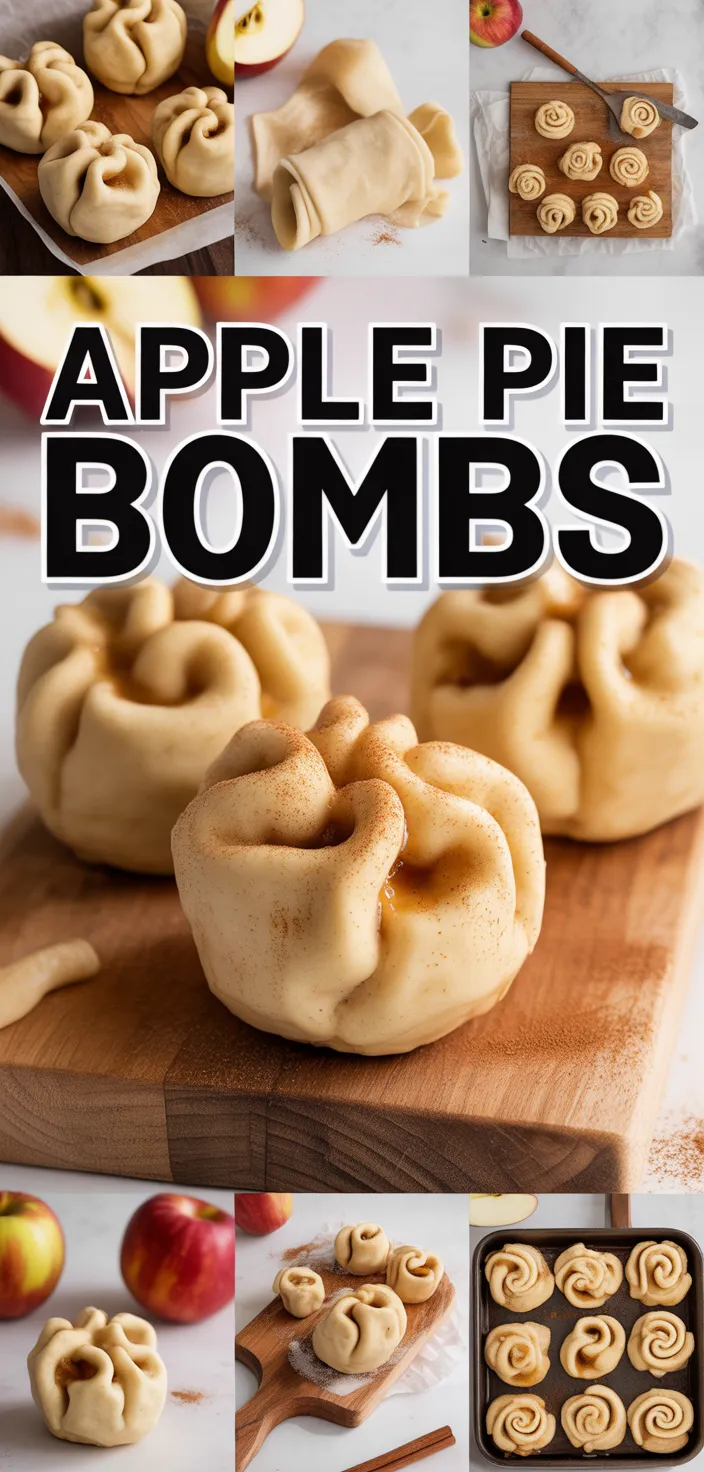
I couldn’t resist calling these Apple Poppers, because they sneak up on you with that first bite. I stuff flaky crescents with a filling made from tart Granny Smith apples, and they puff into golden, slightly messy parcels that taste way fancier than they look.
Perfect for fall when you want a little show-off dessert without pretending, they make people pause, grin, then reach for another before you can say anything. I’ve got a lazy trick that keeps them surprisingly easy even on busy days, and yeah sometimes they don’t look perfect, but that’s half the fun.
Why I Like this Recipe
– I love the contrast between a crunchy crust and a warm gooey center, it just hits every texture note.
– It tastes like fall, cozy and sweet with a little bright zing that keeps it from being too rich.
– They’re perfect for sharing at parties cause everyone grabs one and the plate is empty in seconds.
– They’re pretty forgiving so even when I overstuff or rush the prep they still turn out great, which I need.
Ingredients
- Granny Smith apples bring tartness, fiber and natural sweetness, keeps bombs bright and fresh.
- Butter adds rich fat and mouthfeel, makes filling silky but adds saturated fat.
- White sugar gives straightforward sweet, boosts carbs, no extra nutrients though.
- Brown sugar adds caramel notes and moisture, slightly deeper flavor than white.
- Cinnamon brings warm spice flavor, antioxidant benefits and less calories obviously.
- Crescent dough gives flaky exterior, lots of carbs and refined flour, not wholegrain.
- Oil is for frying, neutral flavor but adds lots of calories, use sparingly.
- Cornstarch thickens filling, keeps juices from leaking and gives glossy finish.
Ingredient Quantities
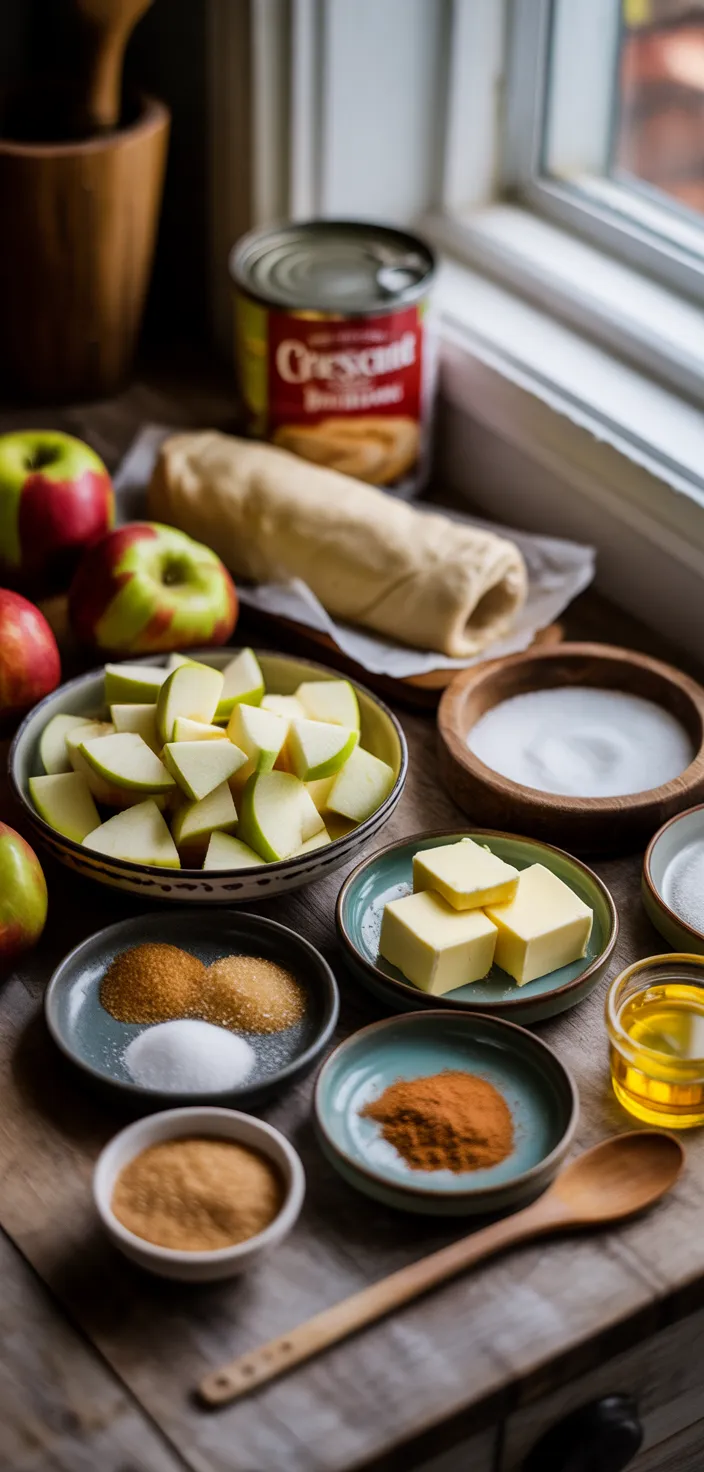
- 3 medium Granny Smith apples peeled cored and diced (about 3 cups)
- 2 tbsp unsalted butter
- 1/4 cup granulated sugar
- 2 tbsp light brown sugar packed
- 1 tsp ground cinnamon
- 1/8 tsp ground nutmeg
- 1 tbsp cornstarch
- 1 tbsp fresh lemon juice
- 1/2 tsp vanilla extract
- pinch of salt
- 2 (8 oz) cans refrigerated crescent roll dough
- about 2 cups vegetable oil
- 1 large egg
- 1 tbsp water
- 1 tbsp turbinado or coarse sugar
- 1/4 cup powdered sugar optional
- 1/2 cup caramel sauce optional
How to Make this
1. Make the apple filling: melt 2 tbsp butter in a medium skillet over medium heat, add 3 cups diced Granny Smith apples, 1/4 cup granulated sugar, 2 tbsp packed light brown sugar, 1 tsp cinnamon, 1/8 tsp nutmeg and a pinch of salt; cook, stirring, until apples start to soften, about 6-8 minutes.
2. Thicken and flavor: sprinkle 1 tbsp cornstarch over the apples, stir well so it coats evenly, then add 1 tbsp fresh lemon juice and 1/2 tsp vanilla extract; keep cooking until the mixture thickens and becomes glossy, about 1-2 minutes. Remove from heat and let cool completely (this is important or your crescents will leak).
3. Preheat oven to 375 F and line a baking sheet with parchment or lightly grease it. Pour about 2 cups vegetable oil into a large heavy skillet and heat to around 350 F; don’t overcrowd, use a thermometer if you got one.
4. Prepare dough: open 2 cans (8 oz each) refrigerated crescent roll dough and separate into triangles; press seams together well to make a single sheet and then cut each triangle in half or use as-is to make 16 to 24 small pockets depending how big you want them.
5. Fill and seal: place about 1 to 2 teaspoons (or up to 1 tablespoon if using larger triangles) of cooled apple filling in the wide end of each triangle, fold or roll up into a small ball, pinch all seams tightly so filling is sealed inside; don’t overfill or they’ll burst.
6. Egg wash and sugar: whisk 1 large egg with 1 tbsp water to make an egg wash; brush each sealed ball lightly with the wash, then sprinkle the tops with about 1 tbsp turbinado or coarse sugar for crunch.
7. Flash-fry: working in small batches, carefully place bombs seam-side down into the hot oil and fry briefly, about 20 to 45 seconds per side, just until they get a light golden crust; remove with a slotted spoon to drain on paper towels and transfer to the prepared baking sheet. Don’t let them sit too long in oil or they’ll soak up too much.
8. Bake to finish: bake the fried bombs in the 375 F oven for about 8-12 minutes, until the dough is flaky and fully cooked through and the tops are golden.
9. Serve: let cool a few minutes, dust with 1/4 cup powdered sugar if using, and drizzle with 1/2 cup caramel sauce for extra yum. Tip: make the filling a day ahead and chill it so it’s easier to handle, and always seal edges tight and keep batches small while frying.
Equipment Needed
1. Medium nonstick skillet for cooking the apples
2. Large heavy skillet or Dutch oven for frying
3. Candy / deep-fry thermometer to keep the oil around 350 F
4. Baking sheet plus parchment paper (or a little oil to grease it)
5. Mixing bowl and whisk (or a fork) for the egg wash
6. Measuring cups and spoons for sugars, cornstarch, lemon juice etc
7. Chef’s knife and cutting board to peel and dice the apples
8. Slotted spoon and tongs to remove the bombs from the oil
9. Pastry brush to paint the egg wash on each pocket
10. Paper towels for draining and a wire rack if you got one
FAQ
Apple Pie Bombs Recipe Substitutions and Variations
- Apples (Granny Smith): you can use Fuji, Honeycrisp or Pink Lady. They’re sweeter, so cut the sugar by 1 to 2 tablespoons or mix one tart apple with one sweet for balance.
- Unsalted butter: swap 1 to 1 with coconut oil or vegan butter. If you use salted butter, skip the pinch of salt; coconut oil will give a faint coconut taste and won’t brown quite the same.
- Crescent roll dough: use puff pastry sheets or a pre-rolled pie crust. Puff pastry makes flakier, lighter bombs; pie crust gives a more traditional, denser pie texture. Biscuits work too for a rustic version.
- Vegetable oil for frying: can substitute canola or peanut oil for frying. Or bake instead — brush the bombs with melted butter and bake at 400°F for about 12 to 15 minutes till golden, or air fry at 375°F for 8 to 10 minutes.
Pro Tips
1) Let the filling cool and chill it first. If it’s even a little warm the dough will get soggy or they’ll burst open, so cool it until it’s firm. If it’s still loose, cook it a bit longer or stir in a tiny extra cornstarch slurry, then chill.
2) Don’t overfill and seal like your life depends on it. Use a small spoonful only, press seams tightly with your fingers and roll the seam under so it sits seam-side down while frying. A little water on the edge helps them stick. Overfilled ones will pop every time.
3) Fry in very small batches and keep the oil steady. Use a thermometer if you have one, or test with a scrap of dough so you know how fast it browns. Crowding the pan drops the temp and makes greasy, soggy pastries.
4) Set them on a wire rack right after frying, not just paper towels. Paper soaks but a rack lets excess oil drip away so the bottoms stay crisp. Don’t let them sit in the oil for longer than it takes to get light color.
5) For easier handling and neater results, chill or even quick-freeze the filled pieces for 10-20 minutes before frying. They hold their shape better and are less likely to leak, plus it makes sealing easier if the filling is colder.
Apple Pie Bombs Recipe
My favorite Apple Pie Bombs Recipe
Equipment Needed:
1. Medium nonstick skillet for cooking the apples
2. Large heavy skillet or Dutch oven for frying
3. Candy / deep-fry thermometer to keep the oil around 350 F
4. Baking sheet plus parchment paper (or a little oil to grease it)
5. Mixing bowl and whisk (or a fork) for the egg wash
6. Measuring cups and spoons for sugars, cornstarch, lemon juice etc
7. Chef’s knife and cutting board to peel and dice the apples
8. Slotted spoon and tongs to remove the bombs from the oil
9. Pastry brush to paint the egg wash on each pocket
10. Paper towels for draining and a wire rack if you got one
Ingredients:
- 3 medium Granny Smith apples peeled cored and diced (about 3 cups)
- 2 tbsp unsalted butter
- 1/4 cup granulated sugar
- 2 tbsp light brown sugar packed
- 1 tsp ground cinnamon
- 1/8 tsp ground nutmeg
- 1 tbsp cornstarch
- 1 tbsp fresh lemon juice
- 1/2 tsp vanilla extract
- pinch of salt
- 2 (8 oz) cans refrigerated crescent roll dough
- about 2 cups vegetable oil
- 1 large egg
- 1 tbsp water
- 1 tbsp turbinado or coarse sugar
- 1/4 cup powdered sugar optional
- 1/2 cup caramel sauce optional
Instructions:
1. Make the apple filling: melt 2 tbsp butter in a medium skillet over medium heat, add 3 cups diced Granny Smith apples, 1/4 cup granulated sugar, 2 tbsp packed light brown sugar, 1 tsp cinnamon, 1/8 tsp nutmeg and a pinch of salt; cook, stirring, until apples start to soften, about 6-8 minutes.
2. Thicken and flavor: sprinkle 1 tbsp cornstarch over the apples, stir well so it coats evenly, then add 1 tbsp fresh lemon juice and 1/2 tsp vanilla extract; keep cooking until the mixture thickens and becomes glossy, about 1-2 minutes. Remove from heat and let cool completely (this is important or your crescents will leak).
3. Preheat oven to 375 F and line a baking sheet with parchment or lightly grease it. Pour about 2 cups vegetable oil into a large heavy skillet and heat to around 350 F; don’t overcrowd, use a thermometer if you got one.
4. Prepare dough: open 2 cans (8 oz each) refrigerated crescent roll dough and separate into triangles; press seams together well to make a single sheet and then cut each triangle in half or use as-is to make 16 to 24 small pockets depending how big you want them.
5. Fill and seal: place about 1 to 2 teaspoons (or up to 1 tablespoon if using larger triangles) of cooled apple filling in the wide end of each triangle, fold or roll up into a small ball, pinch all seams tightly so filling is sealed inside; don’t overfill or they’ll burst.
6. Egg wash and sugar: whisk 1 large egg with 1 tbsp water to make an egg wash; brush each sealed ball lightly with the wash, then sprinkle the tops with about 1 tbsp turbinado or coarse sugar for crunch.
7. Flash-fry: working in small batches, carefully place bombs seam-side down into the hot oil and fry briefly, about 20 to 45 seconds per side, just until they get a light golden crust; remove with a slotted spoon to drain on paper towels and transfer to the prepared baking sheet. Don’t let them sit too long in oil or they’ll soak up too much.
8. Bake to finish: bake the fried bombs in the 375 F oven for about 8-12 minutes, until the dough is flaky and fully cooked through and the tops are golden.
9. Serve: let cool a few minutes, dust with 1/4 cup powdered sugar if using, and drizzle with 1/2 cup caramel sauce for extra yum. Tip: make the filling a day ahead and chill it so it’s easier to handle, and always seal edges tight and keep batches small while frying.